I had the opportunity to play this beautiful, small pipe organ on Friday evening:
Knowing that the organ differed from my practice organ, I went to the chapel Wednesday morning, where I was able to play my piece for the first time on that organ. It went fairly well, but there were a couple of pedal notes that I wasn't playing consistently. Here's why. This is the flat pedal board on the pipe organ:
And this is the concave radiating AGO pedal board on my organ that I'm used to:
Now, it's an adjustment to play on a flat pedal board, but not a huge one. The middle notes are all pretty much the same, but the extreme highs and lows aren't. For the most part, I was playing the pedals just fine. There were two spots in my piece where I struggled. I jump down to the low D at one point, and at another I jump up to middle C.
After leaving the chapel that day, I concentrated my practice on cleaning up my left hand technique and working on finding corner chromatics for my pedal notes (bumping against a sharp to find the right natural note).
Friday morning I played my piece perfectly, over and over again. My left hand was clean, my hands had great non-legato technique, and I was finding my pedal notes from the sharps. I knew that I'd be just fine, but wanted to run through the piece on the pipe organ again, just to make sure. That was a mistake!
Friday evening I arrived early and played through my piece on the pipe organ again, missing those same pedal notes that I thought I finally had down. I was frustrated, and my confidence crumbled. All through the potluck dinner, I just knew that I would struggle with playing the pedals properly.
Finally, when the recital began (I was scheduled to play in the middle) I realized that I needed to feel confident, or I would just crash and burn. I tried to feel excited about this opportunity, and to feel confident in my preparation. I knew that a wrong pedal note is not the end of the world, and I also knew that my feet knew what to do if I just trusted them. I tried to turn my attitude around. I immersed myself in Bach and tried to let the music wash over me.
When it was my turn to play, I was nervous, but really wanted to convey the beautiful message of my simple piece. It began well, but as I approached the difficult spots, I began to focus solely on my feet. A couple of times my left hand just forgot to play! I remember thinking, "Really?"
When all was said and done, my feet played the piece pretty much perfectly, yet my hands had turned to mush! I felt that I did have the spirit of the music in my soul and hope that at least that message came through my train wreck of a performance. I was so disappointed, but at least I had changed my attitude and was able to continue the piece without grinding to a stop in the middle.
Why did this happen?
A while back I posted on getting the brain out of the way. That advice always works for me. If I approach the organ with confidence, knowing that I'm prepared, it comes through in my playing. Unfortunately, I didn't feel comfortable on the organ Friday night, and it definitely showed, to my great embarrassment.
Afterwards, everyone was kind, and I'll chalk it up to a learning experience. After all, it was only the second official recital I've ever played for...
Monday, March 26, 2012
Sunday, March 25, 2012
Sunday Song: Bach's Sinfonia from Cantata No. 29
In honor of Bach's birthday, today's Sunday Song is his Sinfonia from Cantata No. 29, played by Paul Jacobs, Chair of the Organ Department at Julliard School of Music, on the 273 rank Fratelli Ruffatti organ at the Crystal Cathedral in Orange County, California.
Labels:
sunday song
Thursday, March 22, 2012
Guest post: Making organ slippers
On this blog I've shared the importance of proper organ shoes many times. The heel on the shoe facilitates playing notes with the heel and straddling natural keys. The heel also guards against the organist developing a "march fracture," which is also known as fatigue fracture or stress fracture of metatarsal bone. While worth the price, organ shoes can be somewhat expensive.

Sandra Dee Thomas has posted about her journey towards making an affordable alternative to organ shoes, which is a very novel idea. Now that she has perfected her pattern, she has graciously agreed to write a guest post for the blog. As Sandra says, "Shoes are best if you have the money. However, if you don't, or have tried the shoes and do not like them, the Organ Slippers are an alternative. They are a blend of both socks and shoes."
Thanks for sharing your efforts with us, Sandra!
(To view the pictures larger, just click on them.)

Materials:
1 skein of medium weight yarn (your choice of color)
Crochet hook: size E/4 or 3.50 mm
1 10.5"x13.5" sheet of Ultra Stiff Plastic Canvas
1 yarn needle
1 small bag of cotton balls or 3" strips of an old towel for stuffing heel form
1 pair of inexpensive shoe inserts for a guide in shoe sizing (trace out your size)

Overview:
If you can single and double crochet, you can easily make them. Everything is single crochet until you reach the second-to-the-last row in the top of the shoe (7th row). The 8th row is then double crocheted to make room for the adjusting string or shoe lace.
The key is to make sure they are snug on your feet so they do not shift.
By simply following the shape of the insole the slipper should fit just fine.
Making the Main slipper:
Heel Form Insert


Heel Pocket
Sandra has also been working on a portable (silent) pedal board which can be used with pianos and small keyboards, and has promised to share that tutorial in the future. Thanks again, Sandra!
If you would like a .pdf copy of this information, you can email Sandra at SandraDeeSilva at yahoo dot com.
I welcome guest posts from my readers. If you have something you'd like to share, please contact me at ldsorganistblog at gmail dot com.
Thanks for reading!

Sandra Dee Thomas has posted about her journey towards making an affordable alternative to organ shoes, which is a very novel idea. Now that she has perfected her pattern, she has graciously agreed to write a guest post for the blog. As Sandra says, "Shoes are best if you have the money. However, if you don't, or have tried the shoes and do not like them, the Organ Slippers are an alternative. They are a blend of both socks and shoes."
Thanks for sharing your efforts with us, Sandra!
(To view the pictures larger, just click on them.)
Organ Slippers
How to make them
By Sandra Dee Thomas
How to make them
By Sandra Dee Thomas

Materials:
1 skein of medium weight yarn (your choice of color)
Crochet hook: size E/4 or 3.50 mm
1 10.5"x13.5" sheet of Ultra Stiff Plastic Canvas
1 yarn needle
1 small bag of cotton balls or 3" strips of an old towel for stuffing heel form
1 pair of inexpensive shoe inserts for a guide in shoe sizing (trace out your size)

Overview:
If you can single and double crochet, you can easily make them. Everything is single crochet until you reach the second-to-the-last row in the top of the shoe (7th row). The 8th row is then double crocheted to make room for the adjusting string or shoe lace.
The key is to make sure they are snug on your feet so they do not shift.
By simply following the shape of the insole the slipper should fit just fine.
Making the Main slipper:
- Begin at the heel
- Chain 8 stitches.
- Turn and single crochet back through the first row of stitches.
- Increase one more stitch at the end of the row. Chain one and go back.
- Continue going back and forth, increasing one stitch at the end off each row until you reach 12 stitches.
- Stop increasing the stitches in the rows. Crochet back and forth until you reach the ball of the foot.
- Beginning at one end of the last row, crochet back, pick up an extra stitch at the beginning of the second-to-the-last row, reverse. Continue in like manner until you have reached just past the joint of the foot.
- Next, single crochet continuously all around the slipper, reducing stitches at the front as necessary for fit to form the sides of the slipper.
- Double crochet the next row. Single crochet one more row. Tie off. Make a string (125-150 single crochet) and loop it through the double crochet.
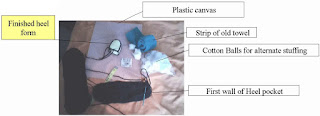
- Turn the slipper over and begin making the pocket for the heel. At this point you may want to stop and make the heel form so you can better shape the pocket to the heel form insert.


Heel Form Insert


Heel Pocket
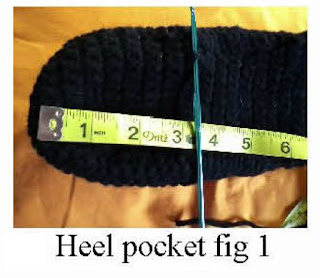
- Measure 3 1/2" from the back of the heel or tie the slipper onto your foot placing the crochet hook on the front edge of the ball of your heel. Hold. Insert the hook into one edge and start single crocheting around the back edge of the slipper.
- At this point, it would be a good idea to place the heel form on the slipper with the widest side next to the slipper so that you can have a guide as to how far toward the heel you need to make the pocket wall. Starting at where you first inserted the hook, you should go one row beyond 2 1/2".
- Continue around the back of the slipper until you have made a "horse shoe" shape. Chain one and reverse back, building a wall that is one row over the top of the heel form. At this point, crochet down one edge of the wall and across the middle of the slipper to connect the two sides of the wall with a single row of crochet. Tie off. Cut yarn.
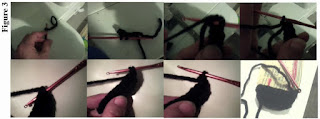
- To close the heel pocket, insert the hook into one back edge of the heel pocket wall as shown in figure 4. Using the form as a guide, crochet back and forth to cover the form.


Sandra has also been working on a portable (silent) pedal board which can be used with pianos and small keyboards, and has promised to share that tutorial in the future. Thanks again, Sandra!
If you would like a .pdf copy of this information, you can email Sandra at SandraDeeSilva at yahoo dot com.
I welcome guest posts from my readers. If you have something you'd like to share, please contact me at ldsorganistblog at gmail dot com.
Thanks for reading!
Labels:
articles,
guest articles,
guest post
Sunday, March 18, 2012
Sunday Song: The Kerry Dance
I hope your Saint Patrick's Day was plenty green!
Today's Sunday Song is Chris Lawton playing The Kerry Dance on a 4-manual, 20-rank Wurlitzer pipe organ that was originally built in 1930 for the Paramount cinema in Manchester city centre. It is now installed in the ballroom at Stockport town hall in the United Kingdom.
Today's Sunday Song is Chris Lawton playing The Kerry Dance on a 4-manual, 20-rank Wurlitzer pipe organ that was originally built in 1930 for the Paramount cinema in Manchester city centre. It is now installed in the ballroom at Stockport town hall in the United Kingdom.
Labels:
sunday song
Tuesday, March 6, 2012
Write in those fingerings!
As a beginning organist, I would practice for hours every week, trying to learn the hymns for Sunday properly. Once I finally felt confident with my technique and tempo, there were too many times when I would be playing a hymn, only to have my fingers become lost. Mid-hymn, I would find myself at the site of a figurative train wreck.
I never understood what had happened. I knew the music. I had rehearsed it for hours and hours with the metronome, methodically increasing the tempo incrementally until I finally arrived at the desired metronome marking. Why were there random inexplicable times when my fingers just forgot everything I had worked so hard to teach them?
For a long, long time, I didn't understand what was happening. I didn't know how to prevent this random occurrence. Finally, it hit me: I never wrote in my fingerings. Most of the time when I played the hymn, I used the fingerings I had practiced. However, at times my fingers chose a different path, and that's when I got in trouble. When I began writing in my fingerings, this "anomaly" stopped happening.
So much of playing the organ is muscle memory. When I'm learning a new piece, I start at a painfully slow tempo, teaching my fingers where they need to go. I spend a lot of practice time at very slow tempos, with the metronome beating the eighth- or sixteenth-note, increasing the metronome one-quarter or one-half of a beat at a time. After numerous repetitions at this lower tempo, the muscle memory sets in, and I can then increase the tempo much more quickly.
There have been times when I wasn't given much notice to learn a piece. One time I chose to just try to practice it near tempo. While I was able to muddle through the performance, it wasn't well played. Another time, I decided to put in the requisite time at a slow tempo, taught my fingers the proper way to play, and although I didn't have time to slowly work it up to tempo, I was still able to play the piece at tempo much more cleanly that when I tried to skip this step.
As I progressed on the organ, I began playing without adding fingerings. I was getting much better, and felt that I no longer needed this step. I was able to play pieces well without this "crutch." Then I attended the BYU Organ Workshop in August, where Linda Margetts and Doug Bush (among others) both stressed the important need for writing in fingerings, even if it's just "skeletal" fingerings, and to erase and change them as needed. It gave me pause, and I thought a lot about what had been said. I started writing in fingerings again--at the very least I wrote in starting fingerings and fingerings in key phrases.
During the Christmas season, I pulled out a couple of pieces I played the year before, when I was meticulous about writing in fingerings. I quickly re-learned the pieces, as the fingerings were still retained, somewhat, in the muscle memory of my fingers and feet and I played them after just a few practice sessions.
Now that I'm preparing for Easter, I pulled out the pieces I played last year, when I "knew better" and they are immaculate. I didn't write in any fingerings or pedaling. As I try to play through them, I struggle because although my brain knows these pieces, my fingers and feet are lost. I don't know where my fingers were when I began them, how I fingered some difficult spots, and now I'm starting from scratch with them, which is immensely frustrating. It will take quite a bit of time to get them performance ready again.
If only I had written in the fingerings for this free accompaniment last year! Writing in fingerings is important for the first performance, but it's essential for subsequent performances after a lapse of time.
Labels:
articles
Subscribe to:
Posts (Atom)


