Click here for Lesson 5: Interpreting the hymn text
Hopefully by now your organ shoes have arrived! We'll use them in this lesson.
Proper Bench Positioning
Before playing the foot pedals, it's important to properly adjust the bench, if possible.
Sitting at the organ, center your body on the D of the pedal board. Some recommend centering on the C#, D#, or even E, but most prefer D. Whichever you choose, keep it consistent. While sitting squarely on the bench, let your legs hang directly in front of you. Your toes should just graze the black keys. If they don't, move the bench forwards or backwards until they do.
Again sit squarely on the bench. If the bench is at the proper height, your feet should lightly rest on the pedals. By moving your ankle, you can play with your toes (on the ball of your foot) or with your heel. You should not have to physically hold your legs up to prevent playing, nor should you have to lean forward or sit forward on the bench in order to play the pedals. Many newer organs have adjustable benches. For example, the Johannus has a knob that raises or lowers the seat. The Allen bench comes with a set of blocks. These blocks can be removed or flipped to provide three different heights for the bench. One or two 1"x4" boards or a 2"x4" board can alternately be used. If the bench is too high it can be cut down 3/4". Try to find a solution, or playing the pedals may be uncomfortable and more difficult that it should be.
The Importance of Clean Pedals
The pedal board of your organ should be clean. The sole of your shoes should slide easily up and down the keys, but this will not happen if the pedals are not clean. If you're encountering resistance, use a soft, clean cloth to polish the pedals and/or consult your owner's manual or local organ dealer for more information on cleaning the pedal board.
Never wear your organ shoes as "street shoes," or you will transfer dirt and grime onto the pedals. Additionally, playing barefoot will transfer body oils to the keys. If you are choosing to play without shoes, make sure you wear socks.
Pedaling Basics
Now that the bench is adjusted properly and the pedals are clean, it's time to discuss pedaling technique.
When playing do not let the knees bob up and down--the motion should be in your ankle. Play with the ball of your foot and your heel. Generally, your right foot should be slightly in front of your left foot--so that your right heel is lined up with the arch of your left foot. Keep your knees together. It's also very important to practice playing without looking at the pedals.
Pedaling Symbols
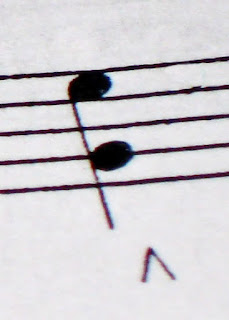
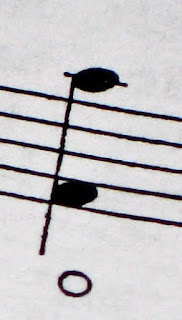
In hymn playing, the bass is generally played by the feet. When the marking is placed above the notes, use your right foot, and when it's placed below the notes, use your left foot. The caret means you play with your toe, and the circle means you play with your heel.
Here is a visual explanation of the symbols:
Here the caret is placed above the notes, so you would play the C with your right toe.
Here the circle is placed above the notes, so you would play the G with your right heel.
Here the caret is below the notes, so you would play the B with your left toe.
Here the circle is below the notes, so you would play the A with your left heel.
Here the note doesn't change. This mark is a substitution. You begin the note with your toe and substitute with the heel, in preparation for the next note.
This is also a substitution, but between feet--from the toe of the left foot to the toe of the right foot.
This is also a substitution--from the toe of the right foot to the toe of the left, in preparation for playing the A with the toe of the right foot.
These marks indicate a glissando--the notes are smoothly played with the toe of the same foot.
Intervals up to a Fourth
It will be helpful to print this next section, bring a laptop with you to practice with this saved webpage, or jot down notes to take along.
For these pedal exercises, select the 8' (and 4' if desired) principal stop(s). In this lesson we will be playing with the toes. The heels will be covered in a future lesson.
To start, at the organ place your left foot over C#/Db and your right foot over D#/Eb. Make sure that your right foot is slightly forward and your right heel is nestled next to the arch of your left foot. Do not cover more than half of the sharp key with your foot.
DO NOT PEEK at your feet! You should be centered on the D, and your feet will be right in front of you. Practice half notes followed by half rests. Play the C#. Rest. Play the D#. Rest. Play the C#. Rest. Continue and get a feel for playing with your feet. Keep your knees together. Use ankle movement to play.
Change the rhythm and note lengths. Try playing quarter notes followed by quarter rests. Repeat the notes. C#. Rest. C#. Rest. D#. Rest. Etc. Take this opportunity to really familiarize yourself with the feel of the pedal board. If you'd like, play Exercise 1 from page eight of the New LDS Organist packet, paying careful attention to attacks and releases. Make sure you hold the notes for their full value, and release precisely on time so that the rests also receive full value.
Second: Now place your feet over the C and D, with the right foot slightly forward as covered earlier. Feel free to practice playing this interval, inserting rests between every note.
Third: Scissor out your toes slightly, keeping your ankles touching, so that your left toes are still over C but your right toes are now over E. Are you knees together (or comfortably close)? Practice playing this interval, then the Second, then back to this Third.
Fourth: Scissor your toes out more, keeping the feet touching, so that you can play the F with your right toe. Remember that "toe" really means the ball of the foot. Keep your knees together. Practice this interval of a fourth and the previous intervals. DO NOT PEEK! It's very important to learn to play the pedals without looking.
Homework
Practice intervals through a fourth, keeping your knees and ankles together.
Practice Seconds, Thirds, and Fourths throughout the pedal board, including the natural keys and sharps, always inserting a rest between notes.
Keep your soles in contact with the keys (or very, very close) and your heel close as well.
Generally your right foot will be forward, however when your left foot plays the sharps, it will, out of necessity, move forward.
Use only ankle motion as you play with your toes, and keep your knees from moving up and down as you play. Your knees will pivot left or right as the ankles move up and down the pedal board.
Don't allow just one foot to scissor out--divide up the angle so that each foot is equally parallel to the keys. For now only play with your toes (the ball of your foot).
Learn how to feel each of these intervals through scissor motion without peeking.
This assignment is all about learning to feel the intervals without peeking. There is no prize for speed. Rather, practice slowly and deliberately. Do not play any faster than you can play perfectly.
In Conclusion
Taking the time now to internalize proper posture and technique, along with locating intervals by feel and not sight will give you a large advantage as you continue to play the organ. We will cover larger intervals and playing with the heels in the future.
Click here to continue on to Lesson 7: More Pedaling.
Monday, February 15, 2010
Subscribe to:
Post Comments (Atom)


thanks so much!!!
ReplyDelete-alex, nyc
Very useful indeed
ReplyDeleteThanks for sharing,please try and do a short video on pedal techniques you just explain so that your student will be sure that they are doing the correct thing thanks
ReplyDeleteThis comment has been removed by the author.
ReplyDeleteIt's quite OK to peek at your feet from time to time. You only have to watch a master pianist playing Chopin's Etude Op. 10 no. 1 for the one-thousandth time, yet he/she will ensure by looking with his/her eyes that the placing of the hands turns out exactly (there are several versions on YouTube). Ditto the pedals - no need to peer all of the time, but there is no rule that says one should not look, and any audience will prefer a performance in which every note is correctly placed to one in which "political correctness" comes at the cost of accuracy.
ReplyDeleteI'm finding it really hard to keep my knees together. Any suggestions?
ReplyDelete